
Welcome to the first post in our new blog series, "reCycleJourney," where I delve into the details of our customer builds. My goal is to provide a comprehensive guide for anyone looking to convert their bike into an e-bike, using real-life examples from our workshop. In this post, I'll take you through the conversion of a 2012 Fuji Newest 2.0 road bike, transforming it into a sleek, powerful e-bike that meets the unique needs of its owner.
The Bike and Its History

The bike in question is a 2012 Fuji Newest 2.0. This particular model was chosen because the owner had ridden it extensively in the past, even participating in a fondo. After a break from cycling, they wanted to get back on the bike they were familiar with and comfortable on. Converting this bike into an e-bike was an attractive option for the owner, combining the familiarity of their trusted bike with the added benefits of electric assistance.
Initial Condition and Goals
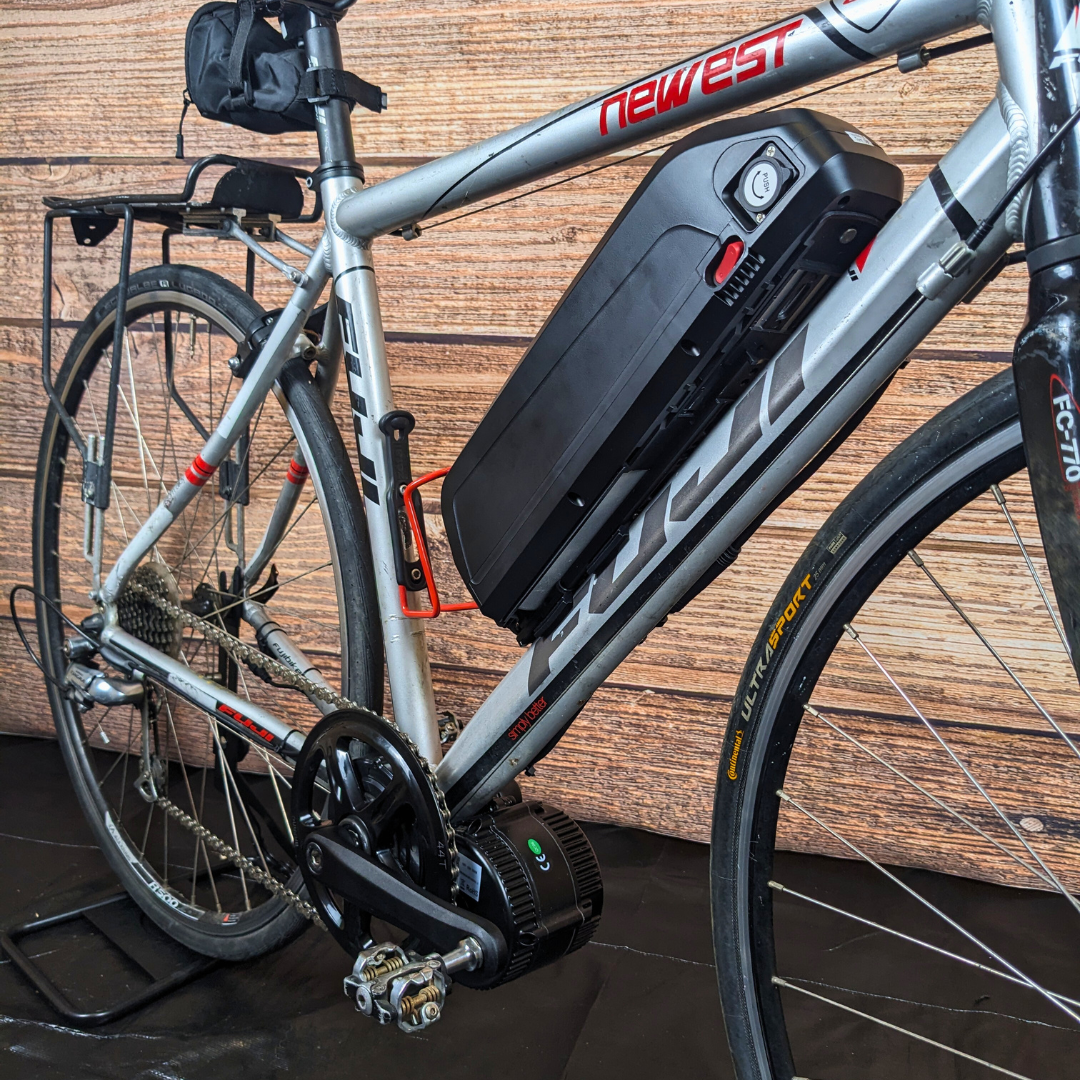
Before starting the conversion, I assessed the Fuji Newest 2.0 and it was in excellent condition. The bike was well-maintained, with no frayed cables and smooth shifting. The brakes worked perfectly, although the tires needed some air, which is expected. The only minor issue was the slightly off-angle bottle cage eyelets. Additionally, the downtube's narrower frame where the bottle cage eyelets were located raised some concerns about battery placement.
|
The new cockpit with the added display and throttle without obstructing the available hand positions on drop handlebars. |

The primary goal for this conversion was to create a light e-bike while retaining the drop handlebars for their multiple hand positions. The owner specifically wanted to continue using the straight bar position in addition to the hoods. The bike was equipped with interrupter brakes, allowing for an upright riding position, which the owner wanted to maintain. The inclusion of a throttle was also a must, which posed a challenge due to the drop bar handlebars.
Components and Installation
For this project, the Bafang BBS02 500W conversion kit was used. Here's a list of the major components installed:
- Motor: Bafang BBS02 500W
- Battery: 48v 17.5Ah Battery
- Display: Medium Display (500c)
- Sensors: Throttle, in-line brake sensors, gear shift sensor
- Additional components: Handle bob for throttle, battery mounting bracket, new chain
I removed the front derailleur, crankset, and chainrings from the original bike. Instead of modifying parts of the bike, I added brackets like the handle bob for the throttle and a battery mounting plate to adjust the battery's position.
|
Grin Technologies handle bob allows for additional throttle mounting positions. Especially useful for drop bar applications. |

I approach each installation methodically. First, I test everything without tightening anything down to ensure the kit works as expected. I start by hooking up the motor, display, throttle, and battery. Then, I assess the bike for potential fitment issues, measuring the bottom bracket, available space for the battery, and checking for obstructions. After ensuring everything is in order, I remove components like the crankset and bottom bracket, clean the bottom bracket, and fit the motor.
Once the motor fits, I mount the battery and begin wiring the various sensors, avoiding tightening anything to keep everything flexible. This can create a mess of wires, but it ensures proper placement before finalizing the installation. After everything is in place, I manage the cables and start tightening everything.
|
A clean unobstructed bottom bracket and small cable guide. Ideal conditions to fit a mid-drive motor. |
The Bafang BBS02 mid-drive motor test fit was a success. |
|
I had to drill into the battery holder to secure it onto the battery mounting plate. |
In-line Brake sensors are more secure and allows you to keep your existing brake levers. |


Mounting the battery was a significant challenge due to the position of the bottle cage eyelets. I used a bracket to mount the battery higher on the frame's downtube to leave enough space for the bottle cage on the seat tube. The limited space and larger diameter drop bars made mounting the throttle and display tricky. Although the brake and shift cables were in great condition, I replaced a brake cable to accommodate the in-line brake sensor, which allowed the existing hood and interrupter brakes to work with the sensor.
 |
|

Testing and Performance
The first test ride was a success. The bike felt very natural and comfortable to ride, with smooth power delivery. I could easily adjust the power levels and had quick access to the throttle when needed. The brakes worked exceptionally well, with the motor stopping immediately when applied. Hill climbs became effortless, and the bike performed admirably overall.

Reflections and Advice
This conversion taught me the importance of patience and thorough planning. Using battery mounting brackets provided a sturdy mounting solution, and in-line brake sensors allowed the use of existing high-quality levers. For anyone attempting a similar conversion, I recommend testing everything before finalizing the installation and always considering cable management for a clean finish.
For future conversions, I plan to explore handlebar extensions for better mounting options for displays and throttles. This project reinforced the value of thinking ahead and being prepared for unique challenges each bike presents.
I hope you found this detailed account of our Fuji Newest 2.0 conversion helpful. If you have any questions or want to share your own conversion experiences, follow us on social media and use the hashtag #reCycleJourney. Stay tuned for more posts in this series, where we'll continue to explore the exciting world of e-bike conversions!

Leave a comment
All comments are moderated before being published.
This site is protected by hCaptcha and the hCaptcha Privacy Policy and Terms of Service apply.